At high water, the beach at Selsey Bill (including Medmerry) is heave shingle, and at low water hard sand and light shingle. Landings by enemy vessels with a draught of up to 5 feet were practicable. The beach at Medmerry was backed by the Broad Rife. The beaches were classed as suitable for landing heavy mechanised units, although exits were generally poor and onto open fields only, except on the west side from East and West Wittering where there where exits onto main roads and from the Lifeboat House westwards where there was also an exit onto a main road. On the east side, Pagham Harbour provided a small inlet that could be suitable for landing small craft.
Following the fall of France, Britain became a theatre of war, and the south coast of Britain was the most likely place for a German invasion. At this time Montgomery’s 3rd Division briefly held the south coast until early July when it was relieved so it could act as a mobile counter-attack force at Montgomery’s instance, as he felt his troops were wasted in a static role. Following the 3rd Division’s departure, IV corps moved from GHQ reserve to Eastern Command to take over the area Kent-Sussex and Sussex-Surrey. The 10 Brigade (part of the 4th Division) was responsible for the area Bognor – Thorney Island with the 6th Battalion East Surrey Regiment responsible for the coast from West Wittering to Selsey. At first, the layout of the defences in Selsey Bill had ignored Selsey itself; instead it was planned to stand back on the line of the Broad Rife. After the sighting of some artillery in the Selsey area to cover the beaches, Selsey was bought into the forward defences, with one company from the 6th Battalion East Surrey Regiment organising defences from the coastguard station to Pagham Harbour. This Battalion now held a front of 15,000 yards and all four rifle companies were stretched out in linear defence, with rifle, medium machine gun and light machine gun posts dispersed and wide intervals between them. The 6th Battalion East Surrey Regiment’s War Diary notes that construction of ‘small pillboxes’ began on 7 July, undertaken by civilian contractors supervised by the Royal Engineers. Instructions issued by 10 Brigade stipulated that on the stretch of the open beach between Bracklesham and Selsey, pillboxes on the beach were to be manned with Bren guns and rifle posts dug into the bank of the Broad Rife.
The defence plan relied on covering the beaches with a continuous belt of fire from automatic weapons, strengthened with artillery fire and the Battalion was supported by 25 pdr field guns from the 30th Field Regiment, a number of 2 pdr anti-tank guns which were quickly replaced by static 6 pdrs or 4 inch guns, 4.5 inch howitzers and two 9.2 inch howitzers (one role of the 9.2 inch howitzers was to engage any enemy seaplanes that landed in Pagham Harbour). Machine guns were to be sited within defended localities for protection. Pagham Harbour thence along Pagham Rife was organised as a Switch Line to link up with Stop Lines in the rear. It was to form a defensive flank facing east or west. It formed a boundary between two battalions and as such was to be prepared for occupation of two companies of infantry supported by one battery of field artillery and one troop from an anti-tank company respectively by each battalion. In the event of invasion the Pagham Rife Sluice was to be closed to flood the surrounding land and deny passage to enemy armoured vehicles. Flooding was expected to begin within 24 hours of closing the sluice.
The 2nd Battalion Duke of Cornwall’s Light Infantry (also 10 Brigade) relieved the 6th Battalion East Surrey Regiment on 12 August. As with most of Home Forces, the 2nd Battalion Duke of Cornwall’s Light Infantry stood ready for immediate action during 7 to 9 September on receipt of the code word CROMWELL – invasion imminent.
Above: map showing artillery that had a role which included covering the beach at Medmerry, 201 Brigade sector.
To defend the beaches – as noted above – weapon pits had been dug in the sea wall bank and the clay removed for sandbags. In October, it was decided to fill in these weapon pits and make good the damage done to the sea wall. If defences were required, engineer advice was to be sought on the best method to deal with the issue. The pillboxes on the bank of the Broad Rife (described below) at the area of today’s breach could thus either have been built following this instruction, but revetted in brickwork and concrete to help protect the sea wall or were some of those built in July onwards by civilian contractors. They remained as part of the defences into 1941 as indicated by the War Diaries, which state there was no reorganisation of the coast defences from Bracklesham Bay to Selsey, unlike along other stretches of the Sussex coast were many pillboxes were abandoned following reorganisation of the defences.
Remaining Defences
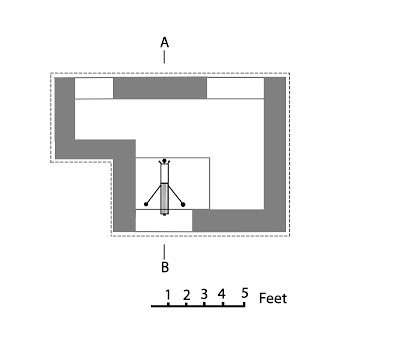
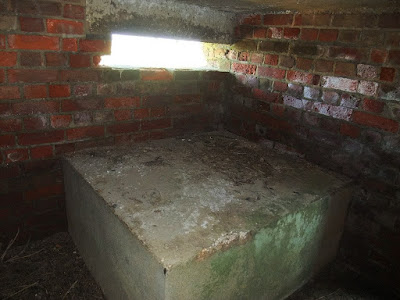
There are six known defence structures at Medmerry along what was the bank of the Broad Rife. Following the realignment, only two are now accessible. Both of these are emplacements for Vickers machine guns dug into the bank. The gird references for these two emplacements are SZ8320494619 and SZ8323494708. They are sited to fire in enfilade along what would have been open fields behind the shingle ridge. They are unusual in that they are clearly based on the standard field work for a Vickers machine gun, which has been revetted in brickwork and given a splinter proof concrete roof, rather than one of the typical pillbox designs for a Vickers machine gun. The emplacements are L-shaped with dimensions of 13 feet by 10 feet minus a 3ft 3in x 5 feet corner. The walls are 14 inches thick and the roof 11 inches thick. There is an embrasure in the shorter front wall with a concrete table behind it on which the Vickers would have been set up upon its tripod. The concrete table measures 4 feet x 3ft 6in inches. There is a second embrasure and entrance in the longer rear wall. The roof was originally camouflaged with turf.
Above: rear of pillbox at SZ8320494619.
Above: front of pillbox at SZ8323494708.
Above: Plan and section of the Medmerry machine gun emplacement.
Above: the standard field work for a Vickers machine gun (Field Engineering Vol. I (All Arms) 1933). The Medmerry pillboxes are clearly a hardened version of this field work.
Above: concrete platform for machine gun inside pillbox at SZ8323494708.
Above: view from the front loophole, pillbox at SZ8323494708.
The four structures that are no longer accessible are known to be in effect concrete trenches for riflemen with overhead cover rather than any of the standard infantry pillboxes. In his book Pillboxes of Britain and Ireland, Mike Osborne describes these trenches as a straight sided concrete trench, with four front facing loopholes, one in the rear wall, an entrance in one side wall and a loophole in the other. He gives the dimensions as 14 feet by 8 feet with a wall thickness of 15 inches. Three are sited to fire frontally, one to the flank.
Along the beach, there are also plenty of remnants of Medmerry’s war history. Fragments of the anti-tank scaffolding obstacle are plentiful and the occasional screw picket – used to anchor barbed wire obstacles – and pieces of angle iron can also be found.
Above: remains of the anti-tank tubular scaffolding obstacle.
The troops holding the Selsey area were able to watch the air battles taking part in the skies over south and southeast Britain during the summer of 1940:
11 July: Three enemy aircraft brought down: one at selsey Bill, one in the sea off Selsey and one further east. Two British planes lost. (Detail from the 6the Battalion East surrey Regiment: air battle – 9 Heinkel bombers and 7 Hurricanes. One Heinkel brought down on Selsey beach by AA fire. Three wounded Germans were extracted from wreckage and sent under escort to Chichester Barracks).
12 Aug: Big air battle, at least 80 planes engaged. Salvo of bombs near the 12th Battalion Duke of Cornwall’s Light Infantry HQ.
13 Aug: Frequent air raid alarms.
15 Aug: 8:15 a.m. – air raid alarms; one Hurricane and one enemy bomber shot down; three prisoners taken but pilot dead.
16 Aug: Frequent air raid alarms; three enemy planes shot down, all crashed in sea and occupants killed.
17 Aug: Frequent air raid alarms.
18 Aug: Frequent air raid alarms; 49 enemy aircraft south over area; two brought down in sea.
19 Aug: 10:45 p.m. – five small bombs dropped at Selsey Bill near searchlight 293122 – casualties two children, three adults and one gunner.
20 Aug: 1:20 a.m. – several bombs fell in vicinity of Pagham Harbour near ‘C’ Company, 12th Battalion Duke of Cornwall’s Light Infantry.
21 Aug: 3:00 p.m. – German bomber shot down (JU88) near ‘B’ Company HQ – 4 prisoners captured.
22 Aug: Four bombs fell in Pagham harbour.
26 Aug: 4:27 p.m. – about 125 enemy planes passed SE of Battalion area. One enemy bomber brought down on beach ‘A’ Company area, 12th Battalion Duke of Cornwall’s Light Infantry, and one prisoner taken, rest of crew dead.
28 Aug: 1:10 a.m. – Whistling bomb dropped near 12th Battalion Duke of Cornwall’s Light Infantry HQ.
30 Aug: 0:52 a.m. – large bomb dropped near 12th Battalion Duke of Cornwall’s Light Infantry HQ beside searchlight 278198.
7 Sep: 10:00 p.m. – Battalion ordered to man positions. Heavy air attacks during the night on Portsmouth, Isle of Wight and Thorney Island.
8 Sep: Battalion again ordered to stand to.
9 Sep: Positions manned day and night. One enemy plane shot down off Selsey Bill at 10:00 am.
10 Sep: All training stopped – everything concentrated on defences.
14 Sep: 2:30 p.m. – 12 bombs on Battalion sector. Extensive damage done to private property.
25 Sep: 0:200 a.m. – four enemy prisoners found in a boat of Selsey on ‘B’ Company’s front, 12th Battalion Duke of Cornwall’s Light Infantry. Big air battle at 3:25 p.m.; two Polish air fighters shot down enemy bomber.
27 Sep: Large number of enemy bombers over 11:00 pm.
28 Sep: 2:00 a.m. – 20 bombs dropped in ‘C’ Company sector, 12th Battalion Duke of Cornwall’s Light Infantry.
2 Oct: 10:30 a.m. – air battle over Selsey which continued out to sea.
3 Oct: 5:45 p.m. – attack on convoy off ’D’ Company beach, 12th Battalion Duke of Cornwall’s Light Infantry, at Wittering.
4 Oct: 7:00 p.m. – enemy dropped bombs in ‘C’ Company area, 12th Battalion Duke of Cornwall’s Light Infantry.
8 Oct: 6:30 p.m. – three enemy aircraft flew over Bracklesham Bay, machine gunning the beaches and buildings. Birdham Road in ‘D’ Company sector, 12th Battalion Duke of Cornwall’s Light Infantry, machine gunned. The enemy was making use of fading daylight.
Hopefully will do a second post on Medmerry's military history - the Selsey Range, also known as the Manhood Range.


Comments
Post a Comment